Plaster & Wood Range Hood Cover- Reveal
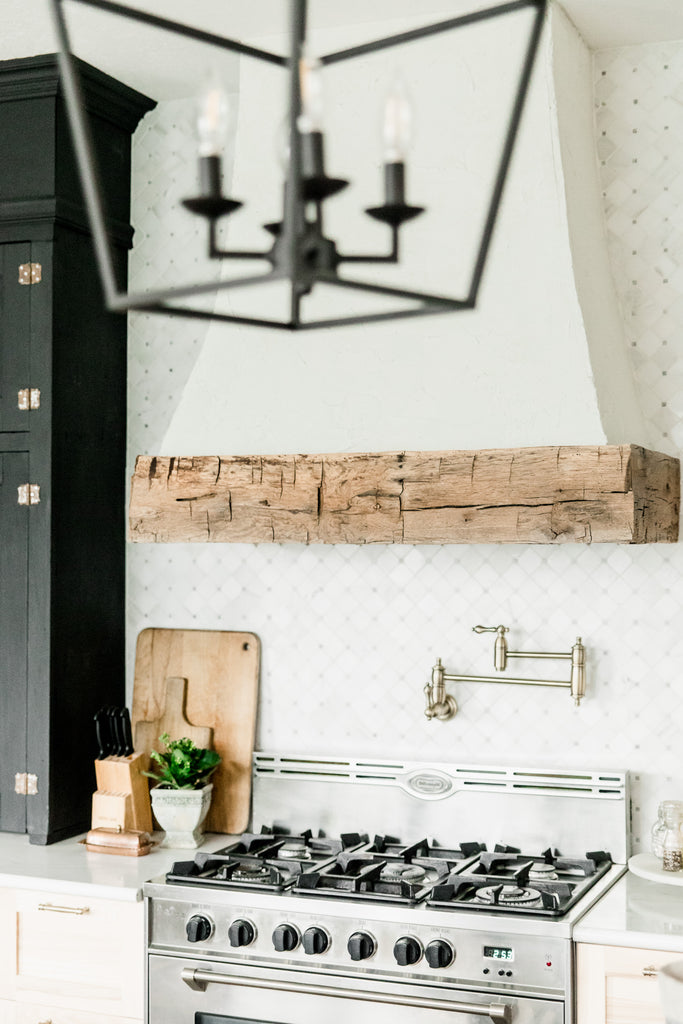
When dreaming up our kitchen from bare studs, I knew I wanted a custom vent hood featuring plaster and a raw wood beam. I loved the idea of the plaster feeling very old world and European while the raw wood would add a rustic element to our kitchen.
I came across Brooke and Henry's blog post here about building your own plaster hood. This article was very helpful and eye opening in the fact that really you're building beauty around the vent itself. I'm not sure why- but I thought custom vent hoods were elaborate (and yes there are some) and confusing, haha? I loved that this article broke down how they built the framing beneath the plaster.
After some more digging, I came up with rough measurements of the 2x6" structure. Our hood is a little different from theirs as I wanted the side panels to also have an arch to match the front arch swoop. I built three tiers of 2x6" rectangles- each one being a bit smaller than the last for the effect of the swoop on front and sides. (Pictured below I just have the top and bottom rectangle screwed into the wall framing.)

After reading about average counter to hood heights (ranging anywhere from 30-35"?) I settled on about 30" for my bottom rectangle piece. Once I had all our structure pieces screwed into the studs- unlike Brooke and Henry's, we cut a very thin plywood (if I'm remembering correctly it was close to 1/4"?) to the shape of the side and screwed that into our rectangular structure. The key is to have a thin enough plywood so that your wood bends for the swoop. I do remember it being a bit more difficult to push the wood shell into the rectangle framing. You'll want long wood screws to really hold the panel pieces to your 2x6" framing.
After some trial and error, we were able to get our shapes pretty well close to what I was envisioning. I knew it didn't have to be perfect since we were covering the panels in plaster and the raw beam would cover the bottom.
 |
 |
I found this vent hood from Wayfair. It had great reviews while being pretty affordable and seamless. Underneath, we built a frame so that the vent hood had something to screw into.
I found an old barn beam at Keim Lumber (a local hardware) several years ago for my birthday. We had to rip the beam down into three long slabs- of course using one of the outside hand hewn pieces for the front of the hood vent. For the plaster, I mixed up a quarter bag of Surecrete. I have a tutorial on YouTube on how I used this product in the shoppe. I love using this top coat concrete because it's easy to apply and dries a nice, white texture- not to mention it also hid all our poor cutting imperfections, haha.

Applying the concrete over the plywood was very simple and took over just an hour to do. Drumroll for the final reveal, please...

 |
 |


 |
 |
I love the look of the plaster/concrete mixed with the raw beam. I can't wait to finish our tile backsplash now! We plan to seal the concrete and raw beam so that stove oils don't ruin anything over the years.

I hope this pretty easy DIY project inspires you to dream up your own custom hood vent!
Hugs, Alyssa
JUNE 2022- 95% Finished:

 |
 |


What size of wood beam did you use? Did you need to seal it? Such a beautiful timeless look😍
What did you use to seal the wood?
Do you have an update on the backsplash?
This is brilliant. Thank you for including details on the plaster/concrete mix. And that beam, to die for. Well done!!
I was wondering too what you used to seal your wood surrounding the hood? Also did you use the same sealer on your open shelves then as well? Thank-you!
Leave a comment